Wednesday 30 January 2013

WOYWW

Hello everyone.  I do hope you are all well? 

 I don't like to start with an apology but I have been a bit tardy with return visits this week. 

 I am sorry, but my pay the bills job is really busy and the next 6 weeks will see the culmination of the delivery of one of my projects (very boring, but the build and roll out of a computer application across nearly 700 people! Sounds as dull as it is, but it is taking 100% of my energy....but after all it does pay my craft stash bills!!!).

On my desk this week is some dylusion sprayed papers which I have overstamped and plan to make into valentines cards....well that's the plan!

My "Man Bites Dog" cards this week spell out "Lady Bites Beauty Heiress"!!!! You really couldn't make it up!

If you'd like to have  a legal snoop around desks across the globe then pop over to see the Queen of workdesks, the lovely Julia here

Right, back to work!

Kyla

Saturday 26 January 2013

Altered and upcycled box tutorial

Hello, everyone.  I do hope you are having a lovely weekend.

If you follow me from WOYWW you may have seen an altered box hiding at the back in various stages of altering.

Well, I finished it and thought I would do a tutorial.  Its a little photo heavy as I still cannot fathom why youtube takes so long to upload (hrs for a 3 minute video!!), but if you'd like to learn how I made some embellishments for pennies then read on.


 I started with an empty box.  It contained a natural sweetener and the box seemed too good to chuck so I thought I would alter it and turn it into a treasure chest.

This is the before


 This is the after.  It cost virtually pennies to make!


I painted the box with acrylics, a mix of brown, black and green.  I then dried it with a heat gun and added some gold, black and green wax to the edges, buffed it up and painted a satin water based acylic varnish over the box to seal it.


To make the embellishments I made some moulds from a metal cog and a skull and cross bones pendant.  

I used a hot glue gun to fill the moulds


 When dry, pop them out of the moulds, there may be some overspill but there is a real easy fix

Tidy up the embellishments with scissors.  I use my Tim Holtz scissors, they have amazing micro serrated blades and this means they are a great work horse.

 When they are all tidied up I covered them in black acrylic dabber and then rubbed gold wax over them and buffed them up.  I sealed them with the same acrylic  sealant and now they are ready to use.

 I glued them to the box with multi medium and added some hinges that I stamped with a paper artsy stamp onto grunge paper and cut out.  I coloured the hinges with copper distress stains and attached them with mini brads


I also made a lock with a paper artsy stamp on grunge paper and added a couple of larger brads at the front which I texturised by walloping with a hammer!!


So there you have it.  A treasure chest ready to fill with whatever you choose.  I was thinking scrunching up some brightly coloured tissue paper inside and filling the box with chocolates!!  

Either way, I think this is a great gift box, a one off and best of all its upcycled and cost pennies...whats not to like?

I'd love to know what you think.

Happy crafting

Kyla

Wednesday 23 January 2013

WOYWW, a tikki and a mop up page

Hello everyone, how are you on this cold and snowy (well in the UK at least) WOYWW?

So, on my desk this week is my heat proof mat with some hot glue skull and cross bones and cogs that I have made ready to decorate my "Truvia" sweetner box (hidden at the back) that was on my desk last week.  The box is drying at the moment (I love multi medium as a glue but it really does take overnight to dry!) so I hope to post the finished box and another tutorial (I really cannot fathom youtube!) on how to make the hot glue embellishments later this week.

My "Man Bites Dog" cards this week are "Romantic suspect slays crazy naked star!"  They really do sound like plots for books sometimes!

I thought I would show you the snowman that my hubby decided to make....
 
Yep, a scary tikki head.  Placed at the end of the garden to spook the neighbours kids!!  I told him it was crafting...but in a manly way!!

The great thing about the snow is that I don't feel gulity about staying in at the weekend, catching up on housework and of course, rewarding myself with some serious craft time.
 
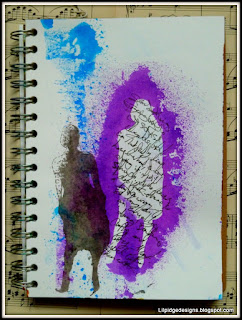
If you saw my stencil tutorial on my last post, I thought I would share with you the 'mop up' page.

This is the page I pressed the leftover of my inky stencils onto.  I really liked the page (I find it difficult to leave white space, I love the effect, but it is something I am really going to concentrate on experimenting with during 2013).  I then did some scribbles in black ink.  It does actually say something meaningful (to me at least) but I have tried to scribble it to disguise the words a little.  For a leftover page I am really pleased with this.

If you would like a legal snoop around desks across the globe you can join in here

Stay safe and warm and happy crafting

Kyla
 

Friday 18 January 2013

A Dyan and Dina inspired stencil tutorial and journal page

Evening all.  I awoke to snow this morning!  Now I know for some of you that is not unusual, but here in the south west of the UK we don't get that much, and certainly not that fast, 5" in a few hours...its covered up all my weeds and dead plants in the garden and it looks so pretty now!

Have you been watching the CHA 2013 video's on the web?  I know I have.  They are so inspiring and I now have a rather long lust list of Tim Holtz new goodies (his new paints look fabulous) and Dylusions (WHITE spray ink!!  I need it, plus ALL the new colours!!).  

However, after spending SO long clearing out my craft space I vowed that anything coming into the room needed to be productive and get used (that includes me!!  I admit I often sit here, Spotify or BBS6 music playing and before I know it an hour has passed me by!!)  and the fact that January is rather a lean month, so I thought I would use up some more of my stash to see if I could make new stash.

Inspired by both Dina Wakely and Dyan Reavley (they are both so talented) I decided to make a figure mask from some leftover plastic.


I chose a figure from a magazine

I traced it with a permanent marker

and cut it out so I had both a postitive and negative image.  

I inked through the stencil with Dylusion inks and then used black acrylic with gold interference paint to add some depth, using the figure cutout to protect the image.
 

I stamped through with a Dylusions background stamp (I use these all the time they are so versatile) and also stamped it with white stayz on using the stamp without an acrylic block so I could bend the stamp slightly and use part of the image.

I added circles of white paint (using the dylusions ink lid as a stamp).

I love the effect, the stencil is no where  near as good as the dylusions one (in either detail or quality) BUT its a great way for me to see if it is a product I would use in the future before I look to making the investment (which lets face it will probably happen quite soon!!).

That's it for now, I am off for a warming cuppa (or maybe some mulled cider.....much more suitable with the snow outside I think!).

Happy crafting

Kyla


Wednesday 16 January 2013

WOYWW

Hello peeps.  How are you all keeping?  Well I hope.

On my desk this week is my 365 journal as I am trying to get ahead of the game and am already prepping Februarys backgrounds.

The truvia box is empty and it seems too good to throw away, so I am thinking of covering it, painting it and turning it into a treasure chest!  Not sure yet, just an idea I have floating around.

I will keep this short as I know fellow WOYWWers will have many desks to get round, but if you'd like a legal snoop around desks across the globe, feel free to join Whats on Your Workdesk Wednesday here The Queen of WOYWW, the lovely Julia is very friendly (mad as a box of frogs if you meet her, but a lovely lass) and there are SO many of us loyal followers that you are bound to be inspired (I know I am).

Happy crafting

Kyla
 

Monday 14 January 2013

Rusting, Resin and friendly plastic...how much CAN I fit on a card!

Hello peeps, how are you keeping?  After over 4 weeks I am finally starting to feel better!  This winters bugs are nasty and so many people have or are suffering.  If you are, I hope you are on the mend.

Have you been watching all the fun of the CHA unfold on the blogs?  I must admit, I have loved every sneak peak and behind the scenes that are being posted (especially Dyan's, Hels and of course the Duke of Distress') and more than once I have almost pressed the "buy now" button on the 24/7 craft shop that is the internet!!  But I am so proud as I didn't (though, not sure how long my restraint will last!).

So, back to crafts....this is the card I made for my Mum's birthday (which was last week so its safe to post it on here now!).

The tag is cut out of patterened paper and put through a script embossing folder and the edges touched with some DI.  I added the picture of the sailboat (its actually a price tag off clothes that my dad saves me 'cos he knows "I like bits and bobs that can be reused!!!")  and added the word "Journey" (as its very pertinent for my mum).  I die cut a bird (also from an upcycled clothes tag) and stamped it with the script outline (from paperartsy).....ooh, it almost looks like I have a plan using 2 lots of script to bring it all together (must admit, more of a happy accident at this stage!).  I added some flower ribbon, a flower and some beads on a wire.

At the top of the card I added a buddha that I made from a mould and some friendly plastic, as my mum is interested in buddhism, some TH film strip (as she is always taking photos) and attached it with my tiny attacher (I am still loving this tool).

In the middle of the flower I added a pink heart that I made from resin and some bells that I rusted.

I stamped a card base with my TH script (ooh..this is really looking like a plan!) to bring it all together and added some buttons and a bit of fern to balance the card.

Right, I am off to scan the virtual world for more CHA fun!!

Happy crafting
Kyla


Wednesday 9 January 2013

WOYWW

Welcome back everyone.  Have you all gotten back into the swing of things?  Finished off your Chrimbo choccies and the last swig of sherry?  No?!  Well done, as they say choccies and sherry are for life not just for christmas (or is that a dog....never sure on that one!!).

So this week on my desk (I still have a tidy room....well tidy for me!) is a selection of journals and gesso.  I have my A4 365 Journal (for the Kate Crane challenge see the link in my side bar), my A5 journal for wipe ups etc and my small travel journal....if I am getting paints out I may as well prep several pages at one time (ooh, get me.....tidy and organised!...Place your bets, how long will this last?!).


My Man Bites Dog cards this week spelt out "New Cop Lost Convict DNA"....I was quite pleased with the cards this week!

If you spotted my tutorial in my earlier post and you know HOW to get wretched youtube to allow me to upload a short video in less than 5 hrs....please let me know!

So, if you'd fancy a legal snoop around desks across the globe then visit the queen, Julia, here for all the deets and links (including the date for the next WOYWW crop!!!!  Not that some of us dropped hints for another one!!)

Happy crafting

kyla
 

Sunday 6 January 2013

Stencil tutorial with moths

 Hello, I hope you are having a fabulous weekend.

I thought I would post a tutorial (tried videoing it but after 2 hrs awaiting for youtube to upload only 3% of it I gave up and assumed that I have done it wrong! So am using photos instead).

I had some left over thin plastic sheeting I got from the scrap store (left over recycled industrial waste-no idea what its original purpose was) and decided to have a go at making my own stencils.


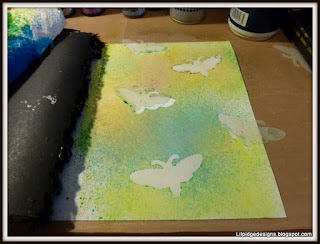
 I cut a few moths (I must admit, I prefer moths to butterflies....much more mysterious) with my big shot  and my paper artsy moth die.


I made sure I had them flying in different directions

 I then used the positive and negatives of the stencils and coloured them with my dylusion sprays and a touch of heirloom gold perfect pearls spray


 I over stamped with my Tim Holtz script stamp and adirondack pesto ink pad


 I peeled the moth stencils off (cleaned them...well, wiped them on the apron...and set them aside so they can be used again) and with archival ink I added the paper artsy moth stamp


 I roughed up the edges with my ever present Tim Holtz scissors


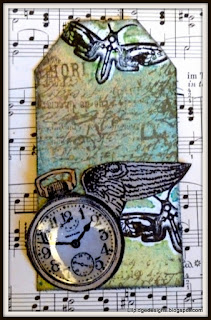
Used the masking technique to add some wings to a clock face

Then attached the clock and added a layer of glossy accents for the glass like finish


I also made an ATC using the left over stenciled paper and my TH ATC die, adding some a typed word, some torn and distressed cardboard from my recycling bin and I cut out one of the moths from my TH paper stash


I admit I am a big fan of stencils and I will definitely have a go at making them again, maybe even a free hand cut one?

If you have a go at making your own, I would love to hear how you got on.

I am entering the ATC into the http://funwithatcs.blogspot.co.at/2013/01/challenge-78-something-new.html

Happy crafting

Kyla

Wednesday 2 January 2013

WOYWW first one of 2013

 Happy First WOYWW of 2013, I hoped you all had a marvellous festive break and are ready to crack on with a new year and meet head on anything it throws at you?!

So, I took this photo a few days ago...hubby went to the sales (I must admit, for a woman, I really cannot stand shopping at the best of times so avoid the sales as best I can!) and I decided to blitz my craft room!!

I pulled out all the storage containers....emptying them into 3 piles (bin, charity/swap and keep) but soon I ran out of room...

 and spilled all over our bed in the next room!!!  I had music playing loudly and was really getting into it when I realised it was dark outside, it looked like a whirlwind had hit our house and he would be home soon!!  So, I girded my loins (I presume you can still do that these days?!!) and pulled my finger out...
 Check it out!  Now I know to some of you fellow WOYWWers this still looks messy, but believe me everything is in a box, pot of takeaway container (those things are SO useful!).  All the bits on the desk are mainly photos of previous makes I use as inspiration so it looks worse than it is...but look...there is carpet (admittedly its covered in glitter and ink sprays....boy that stuff does get everywhere!).
 So, my desk this week is clean!  The 'Man Bites Dog' cards are "Actor Shoots Mystery Tourist"....ooh!


Whilst cleaning up I found my dad's x-acto knife kit (must be at least 30 years old)...I love the fact that it can be used for stripping (think they may have changed its meaning these days!) and taxidermy!!  A new craft for me maybe?!

Sorry this post is photo heavy, I tend to keep Wednesday ones short, but if you fancy a legal snoop around desks across the globe, then the queen of desks, Julia, can be found here

Happy Crafting

Kyla
 

Tuesday 1 January 2013

365 Journal days

 Happy New Year everyone. 

For the past 12 months I have been taking part in Kate Cranes 365 journal challenge here 

Its the first time I have done journaling and its defiantly the longest I have ever stuck with anything!  A whole year!!

Here is the roundup of my year 


 The Olympic torch came through our village....it was great to see the streets lined with people and everyone cheering
 My book started falling apart in Jun so I had to wind some fancy wool around it to hold it all together!


 Nice and 'hot' colours for August....just to remind me that it is actually summer....wettest one for more than 100 years, west country flooded again!

I couldn't resist adding some leaves and apples to September's page....apples are so important here in the west country....cider!  Drink of the gods!!


Then it starts all over again (albeit in a larger journal so I have more room to decorate!)


For those of you who have been thinking of joining in...I can thoroughly recommend it, once the page is decorated each day only takes a minute....and its been great reading through the years enteries and remembering what I have been up to (memory isnt quite what it used to be!!!).

Happy Crafting

Kyla